
Screening Assistant 2
Quickstart guide
Last edited: 06/10/2011
By: VLG
Sourceforge: SA2 website
Help: SA2 forums
Documentation index
This page will guide you through the basic utilisation of SA2. In this tutorial, you will learn how to perform simple and common tasks such as importing molecules, importing properties, viewing your molecules... A MySQL server must be installed on your machine or on a reachable network to go through this tutorial. See the installations and requirements section for all installation instructions. You may also want to read about the important terminologies used by SA2 before starting this tutorial. At the end of this tutorial, you will be pointed to other sections of the documentation dealing with more specific functionalities of SA2.
Table of Contents
- Introduction and data
- Starting SA2 and creating a new database
- User interface
- Importing new SDF files (containing properties)
- Importing CSV file
- Importing Fingerprint
- Basic visualisation
- A word on selection management
- Let's create new libraries !
- Conclusion and further readings
Introduction and data - top
In this small tutorial, you will learn how to import molecules, visualise your molecules, and create new subsets of molecules (Libraries). We will use some SDF file that we have randomly extracted from a database of more than 6 millions molecules. Each molecule in these file has been standardized using a specific Pipeline Pilot protocol, and the 3D coordinates have been generated using Corina. We also provide you a set of MOE2D descriptors that we will use to illustrate the import of properties in the database. All the files used are located in the sample-data/ directory, which is included in the SA archive since the 1.0.2b version.
- sample-data/Provider1.sdf: 100 molecules with MOE2D descriptors
- sample-data/Provider1b.sdf: 200 molecules with MOE2D descriptors
- sample-data/Provider2.sdf: 100 molecules without MOE2D descriptors
- sample-data/Provider2_MOE2D.csv: semi-column separated text file containing the MOE2D descriptors of molecules contained in the Provider2.sdf file.
- sample-data/All_SSKey.csv: semi-column separated text file containing a fingerprint that can be calculated / stored in SA2. It will be used to illustrate the import of fingerprints in the database.
SADB ID is the field corresponding to the identifier of each molecule.
Starting SA2 and creating a new database - top
OK lets start doing some SA2 stuffs. Run the executable binary of SA2 (located in $SA/bin/), or use the shortcut installed if you used the automatic installer. Note that you cannot run two (or more) instances of SA2. After a few seconds, the following window should popup.

At this point you have to (1) connect to the MySQL server of your choice, and (2) create a new SA2 database. Let's detail a bit these two steps.
Connecting to the server
You can either connect to a local server (i.e. a server installed on the same computer as SA2) or to a server running on a different computer which can be reached by whatever network protocol. To connect to a server installed on your computer, enter "localhost" in the server text field. To connect to a distant server, enter a valid, reachable URL (e.g. an IP adress) in the server text field.
Once done, you will have to enter your user name and your password, that you had previously created just after the installation of your MySQL server in the appropriate fields. Click on the connect button to establish the connection.
Creating a new database
Once connected, a list of databases compatible with the current version of SA2 should appear in the "Existing database" table. In our case, this list should be empty, as this is the first time you've run SA2. Lets populate it then. Click on the "New" button.

In this window, you simply have to enter the name of the database and an optional description. You also have to choose which handler to use for your database (note that this choice is definitive). The name of the database must fit a specific pattern. It should not contain any space or special character; in such case, a warning message will be displayed as shown in the screenshot, and you won't be able to create your database until your name fits the pattern.
When you are done, click in the Finish button. The database will be created. Many operations will be performed, such as creating tables and inserting various pre-computed data (e.g. PCA-based reference chemical spaces - DRCS). One or two seconds will be needed for the database to be created, depending on how fast your computer is.
Once the database has been created, it will appear in the table. Select it, and click on the "Open" button to open it. Rendez-vous to the next section then.
User interface - top
Once you open a database, a set of windows opens automatically. When running SA2 for the first time, a default window organization (layout) will be setup. Note that you can completely reoranize your windows. Try to play around with opened windows (drag them, undock them using left click...) so you can get used to it and see all the possibilities offered by the windowing system. Here is an example of layout we often use in our lab:

A more detailed overview of the Graphical User Interface (GUI) can be found in the dedicated section of this documentation.
Importing SDF files - top
Let's import new molecules! Note that the full workflow describing what SA2 will do when
importing a new molecule can be found in the
Import workflow section of this documentation.
Click on the second button on the toolbar, or use File->Import SDF in the menubar.
There are 4 configuration steps before starting the actual import process. Let's detail each
of them.
Important note: we will import a SDF file containing properties here. If you are not interested in importing existing / new properties, you can skip the 4th step, thereby making the import process a bit faster.
1. Input file, properties and basic calculations

- Set the input file as being the Provider1.sdf file located in the
sample-data directory.
- Select the "SADB ID" field as the name field of each molecules (note that all other
properties have been automatically detected as well). To do so, click on the selection
drop-down box, and type S when the list of fields popups. This should leave
you directely to the right field, instead of scrolling the entire list of properties.
- Leave the checkboxes just as is. In SA2, if you are not interested in either the
HTS-related flags, or the scaffold / frameworks calculations (which are used for
diversy analysis though!), just uncheck them; the import process will be faster then.
- Click next (easy hu..!)
2. Providers / Libraries
During this step, you must inform SA2 on the origin of our compounds. If you are building a database dedicated to store chemical vendors collections, you will want to assign each collection to its dedicated provider. If you are importing a library that corresponds to a medicinal chemistry project, just create a new provider for this project. In our case, we will create a new dummy provider.
Note that during this step, you can also associate your molecules with a new or an existing libraries. Libraries are slightly different from Providers: they represent subsets of molecules in the database, while providers represents the origine of molecules. Learn more about these simple (yet important) concepts in the dedicated section.
In this example, we will not create libraries.

- Type "Provider 1" in the name field.
- Leave the Comments text area empty (or write anything you want...)
- Leave the Associate library option unchecked.
- Click on the "Create" button. This should leave you to the previous screenshot.
Note that you can't reach the next step if you haven't selected an existing
Provider or created a new one.
- Click next
3. Importing properties
Let's now import descriptors in the database. This step actually allows you to import properties available in your input file, in existing or new Property Tables. In our case, we will import the MOE descriptors available in the input file, in the MOE table that is already available in SA2.
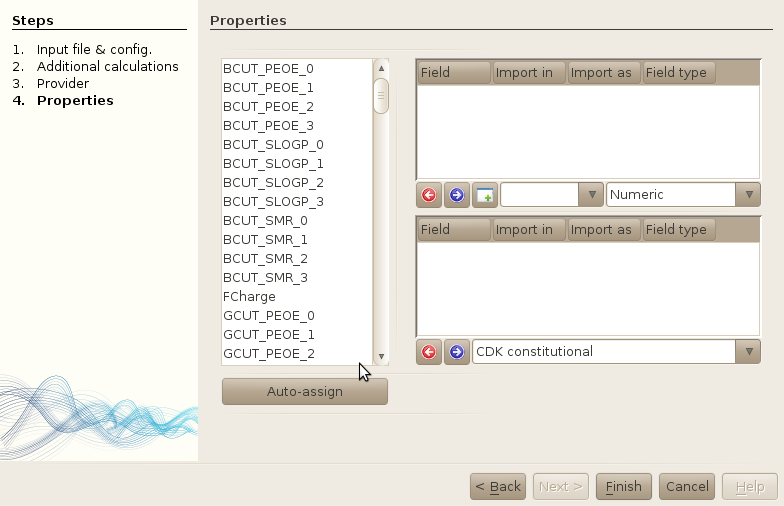
The window is splitted in 3 main parts: the left part is a simple list of properties that
have been detected in the input file.
The right part is splitted in two more parts: on the top, you will find the properties
that have been assigned to new tables, and on the bottom, you will find the list of properties
that have been assigned to existing tables. In both parts, you can click on the arrow pointing
to the left (red one) to remove a property from the import process, and on the right arrow
(blue) to import a property in a new (top) or existing (bottom) table. The creation of new
tables will be described later.
- Click on any property in the property list. This will bring the focus on the list of
properties.
- Press CTRL and type A on your keyboard. This allows you to select all properties
available in the list. Alternatively, select the first property, scroll down to the
end of the list, press shift and click on the last property.
-
Assign properties
Click on the "Auto-assign" button. SA2 will automatically make the correspondance between the name of the properties in the input file, and the name of the properties that can be stored in the database.
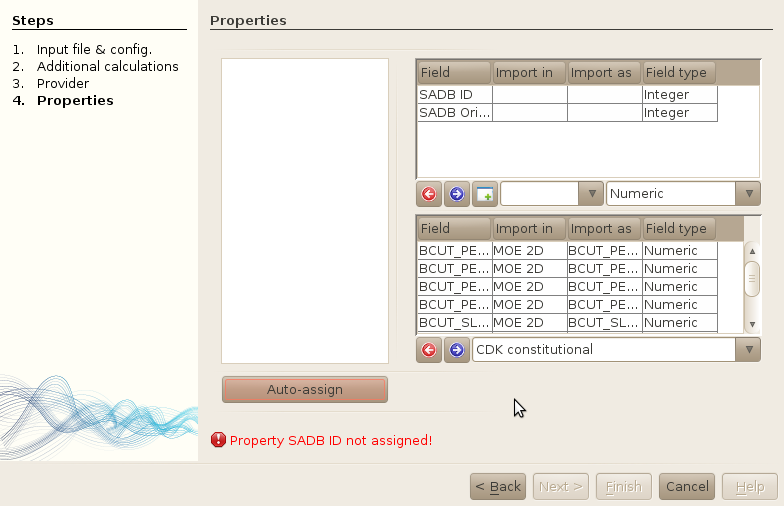 Note: All unmatched properties will be assigned to the new table section,
and you will have to either remove them from the import, or create a new table and
assign this table to the properties in the top table.
-
Remove undesired properties
At this point, all properties have been assigned to either an existing field, or a new table (undefined). An error message is displayed to inform you that some properties have not been assigned. As you can see, two properties have been assigned to the new tables part of the window. We dont want to import these new properties, so select both of them, and click on the left arrow to remove them from the import process.
-
Check correspondance !
 Everything seems fine now (the error message should not be here anymore), but
actually it is not ! In the database, several properties might have the same user name !
This is the case for some MOE descriptors that have the same name as some
SA1 / JOELib descriptors, e.g. the TPSA or Weight properties.
Both properties have been assigned to the SA1 descriptors table, while we
expect them to be associated with the MOE2D table. We could have changed this but we
decided to keep it as a good illustrative example of things that you should pay attention
to.
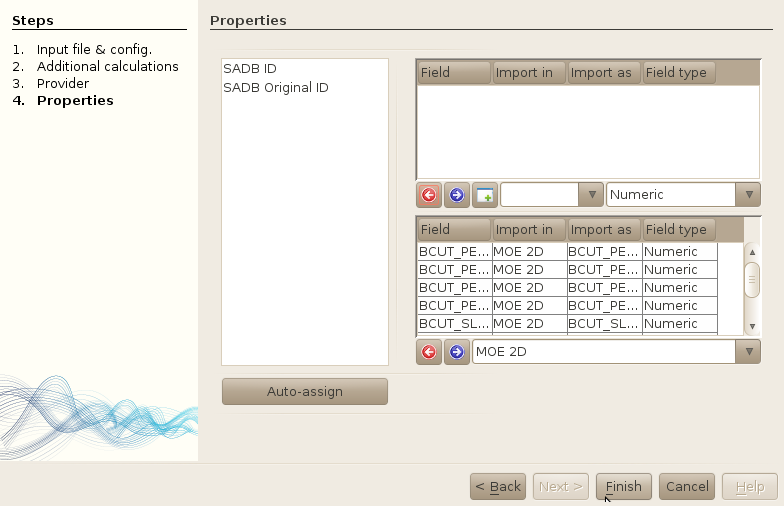
Let's ensure that all the properties have been assigned to the right fields. As we already know that all descriptors should be imported in the MOE2D table, we will assign all fields to this table in a single operation:
- Select all properties in the list of imported properties (do the CTRL+A stuffs).
- Click on the drop-down combo box right next to the blue arrow button, and select the "MOE2D" table.
-
All the properties have been assigned to the MOE2D table.
Note: If a property was not assigned to any field available in the selected table, an error message would be displayed and you could not go further in the import process. In other words, you can't create new fields in an existing table during the import process :) (but you can do it using the Properties window).
4. Workers (additional calculations)
Last but not least, the additional calculation. If you haven't done yet, learn about workers in the Terminologies section or in the specific section where a detailed description of each available worker is provided.

Here, just leave all workers unchecked. Note that each worker can be configured through the buttons located in the third column of this table. You will be able to select what the worker will do (which descriptors should be calculated...), and eventually set more specific parameters.
Click on Finish to start the import.
The import procedure should not be too long. An output window should open to inform you on the
various steps and eventual errors detected, as well as a progress status bar located on the
right bottom part of the main SA2 window.
Once the importation is finished, you may want to practice a bit, and repeat the process for the Provider1b.sdf input file. The only difference will be that you will assign to this input file the same provider as for the first imported file instead of creating a new one.
With a bit of practice, it takes me no more than 10 seconds to complete the 4 steps described previously.
Importing properties - top
We will now import another SDF file, but which does not contain any properties. Once done, we will import the corresponding MOE2D descriptors stored in a separate semi-colon separated text file.
- Import the sample-data/Provider2.sdf in the database. Follow
the steps described previously, but: (i) create a new provider (e.g. "Provider 2")
for this file, and (ii) do not import any of the two properties. Also, make sure that
you assign the "SADB ID" as the identifier of each molecule.
- Once done, click on the Import properties button
 in the toolbar, or go to File->Import properties.
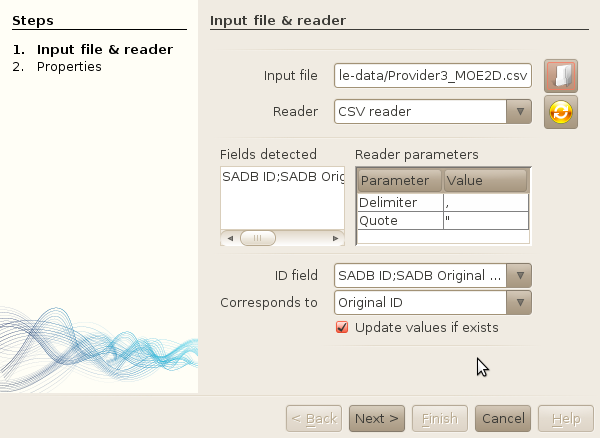
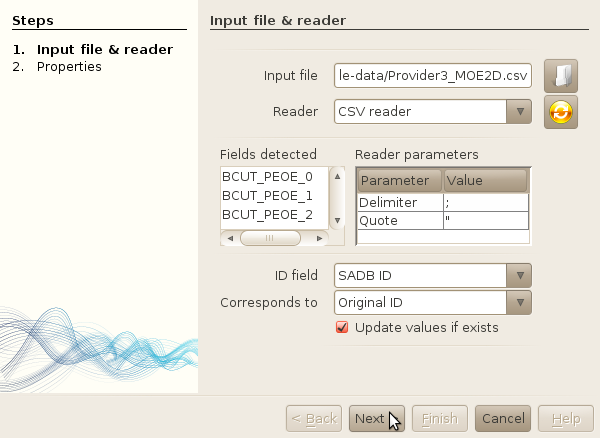
- Select sample-data/Provider2_MOE2D.csv as the input file.
-
Once done, you will see that a default reader (CSV reader) will be assigned. However,
the reader used a comma as a separator, and we want it to be a semi-column. Change this
in the Reader parameters table. The list of detected fields should be properly
reloaded now.
- Select SADB ID as the ID field, and select "Original ID" as the corresponding field in
the database. See the IDs section of the
documentation to know more about compounds idenfiers in SA2.
- Leave the "Update values if exists" checkbox checked (it does not matter here, but you can
choose not to update the properties if they are already stored in the database).
- Click next
- Import properties just as described previously. The user interface is exactely the same
compared to the SDF import, so there is nothing new here to explain.
- Click finish to start the import of all properties.
Importing fingerprints - top
We will now import the values of a fingerprint available in the database: the SSKey
fingerprint that was available in SA1 (and is still available in SA2).
As mentioned previously, this fingerprint can be directely calculated using the
JOELib worker.
As you will see, importing fingerprints is quite similar to importing properties. The main
difference is that you can't create new storage capability for a new fingerprint during
this process.
- File->Import fingerprints
-
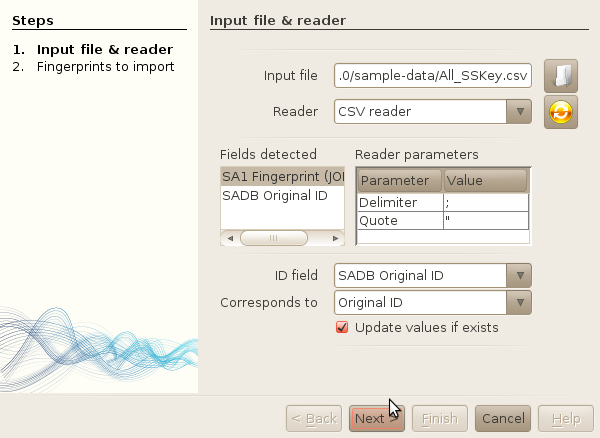
Browse your local drive and select the file
sample-data/All_SSKey.csv
-
Update the parameters of the CSV reader to use semi-column as separator.
-
Select the ID field, and set the Corresponds to field to
'Original ID'.
-
Click next.
-
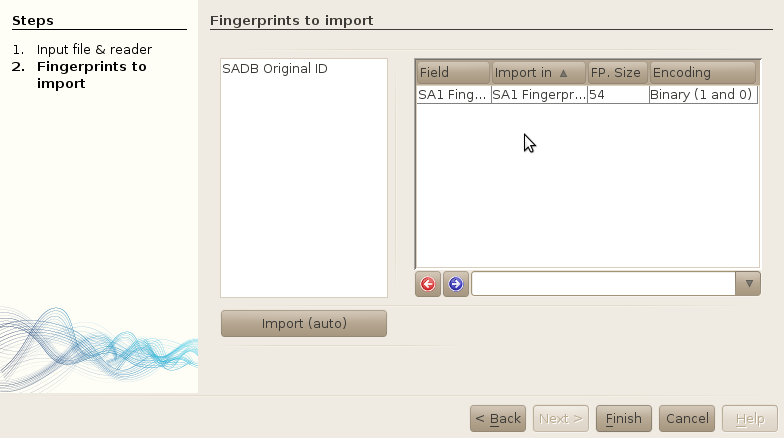
Select the SA1 fingerprint (JOELib) and press on the blue arrow. The fingerprint will
automatically be associated with the corresponding fingerprint in the database.
Note: if no correspondance was found (e.g. a different name was used in the input file), you can force the fingerprint to be imported in the table. If there is actually no fingerprint corresponding to the input file in the database, you will have to create the fingerprint table before importing the data. See the Properties section of this documentation for more information.
-
Finish.
You fingerprints will be imported, and you will now be able to use them for e.g. similarity searching or diverse subset creation.
Lets now take a closer look at our compounds and properties.
Basic visualisation - top
We will now describe a very straightforward way of viewing our compounds. Before doing so, let's ensure that the appropriate windows are opened. Most of these windows should already be opened if you read the documentation about setting up a better default layout before running SA2 for the first time.
- Open the following viewers, which are intended to represent different information on a single molecule selected in other views. Click in each link to have a more detailed description of what is shown in each view, but the basic name is enough to get a quick understanding of what will be displayed: OK that's a lot of windows; remember that you can put each window pretty much anywhere you want (and even don't open them).
- Open the following viewers, which will display molecules as simple lists along with various properties:
- All these windows will open in the main centered area of the interface. You can now play around with each viewer. When you select a single molecule, the content of each so-called "single view" will be updated to display the information (structure / scaffold / properties / whatever...) associated with the selected molecule. Conversely, the ID(s) of the selected molecule(s) will systematically appear in the Selection window when a molecule is selected in whatever view allowing to perform selection. In the next sections, we will learn a bit more about this Selection window, and we will then create new libraries based on selected molecules.
A word on selection management - top
In simple table as well as in various plotting facilities, you have the possibility to select interactively one or several molecules. When doing so, the full list of selected molecules will appear in the Selection window, usually located in the right of the main SA2 window. You can subsequently perform various operations on these selected molecules using the vertical toolbar located on the right of the window.

As you will see, you can also synchronize the selection between the different views by checking the Synchronized checkbox. This way, when you select one or several molecules on either a table, or a plot, all opened views will be updated to select the same molecules (if available !).
Learn more about this view in the GUI section of this documentation.
Let's create new libraries ! - top
We will now create new libraries. For the recall, Libraries in SA2 represents subsets of molecules. We will illustrate this point using three simple approaches: (1) create a library based on selected molecules, (2) create a library using simple filtering rules, and (3) create a library grouping molecules that have a common scaffold (or framework). Note that there are other ways of creating libraries, e.g. by merging existing libraries, by complementing existing library, by using diversity algorithm etc.
(1) Using selection to create a new library
A simple way of creating a selection is to use the Selection window. Let's do this by creating a new selection containing all fragment (RO3 compliant) molecules.
- Open the Flags table view: Window->Molecules->Flags table
- Click on the RO3 column (that should be the second one) to order compounds based on this flag. You may have to click twice to obtain the descending ordering (RO3 compounds will be at the top of the table). The compounds that satisfy the RO3 should be coloured in blue.
- Select all these compounds.
- In the Selection window, you should see the database IDs of all your
selected molecules. Click on the first button on the left of the window (pass your mouse
over each button to see what they allow you to do, and select the one that allows to create
a new library based on selected molecules).
 If you select any of the row in the Selection window, the effect of each action
available through the buttons located on the right will apply to
the selected molecules! In other words, you can select a subset of the
selected molecules to save them in the database. If you want to save the entire selection,
you must not select any row in the list (or you can select all of them).
- Enter a name for your new library and press OK / finish
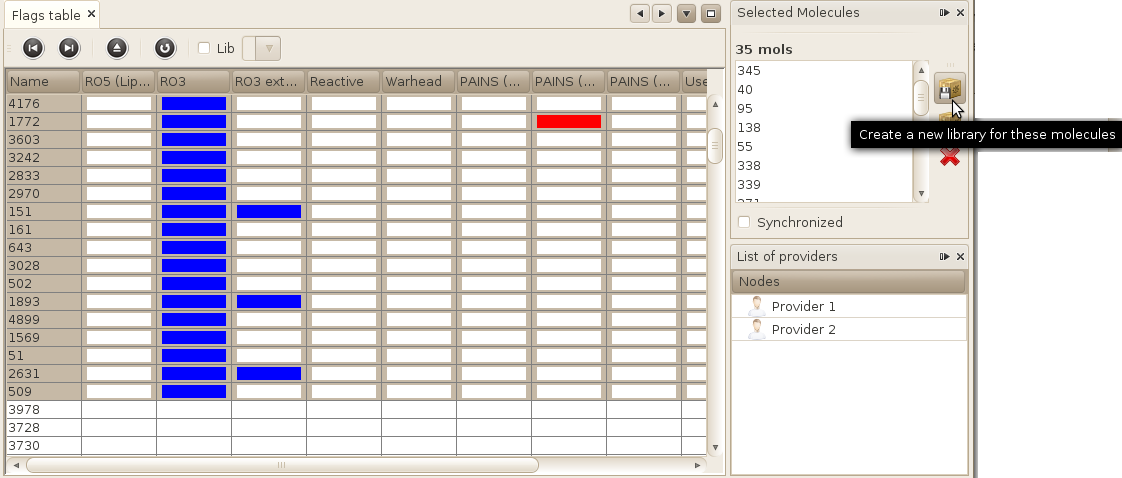
Your library has been saved. It should now be visible in various windows, including the List of libraries window, and in all other views (Flags table...) that allow you to view only one particular library.
(2) Creating filtered library
Let's now create a filtered library. We will create the exact same library as previously, but using a smarter way. Indeed, you probably noticed that the previous process is OK when you have only a few molecules, but becomes quite boring if you deal with a large database. Moreover, you don't want to use the sort capability of these table for large database. Let's makes the process a bit more automatic then.
- Compute->Library->Add filtered library
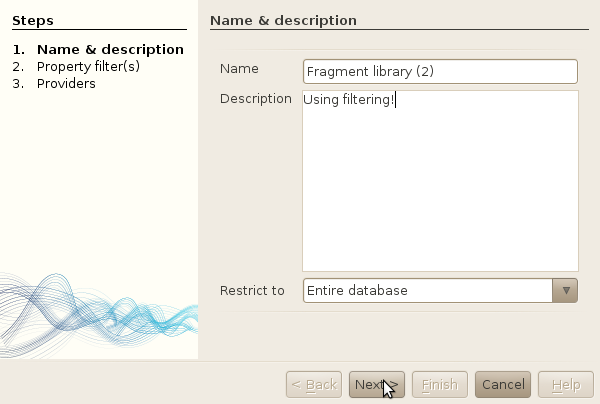
- Type 'Fragment library (2)' as the name of your new library. Leave the "Restrict to" dropdown box as is. (changing this option, you can create a new filtered library based on an existing library !)
- Click next.
- Expand the property tree to find the RO3 property in the Basic properties table located at the root of the tree.
- Select this property, and click on the blue arrow in the middle of the window
- Enter the desired value for this property (we want fragments -> RO3 = 1)
- Click next.
- Leave the last step just as is. You also have the possibility to restrict the search to only one or several providers.
- Click on finsh.

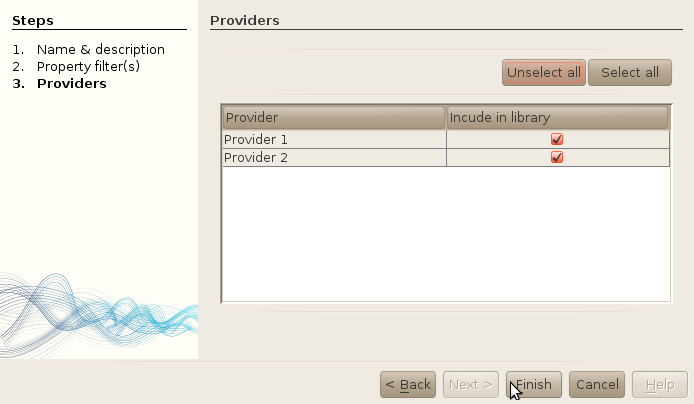
Your new library has been created.
If you are not convinced, open the List of libraries window. You should see your two libraries. Left click on each of them, and select Properties. You should see that they both contain the same number of compounds. This properties windows is available for most database entities (Providers, Libraries, Properties / Tables...), and must be used if you want to change the name / description of one particular entity, or see some interesting properties (e.g. the % of explained variance of each component for a DRCS model).
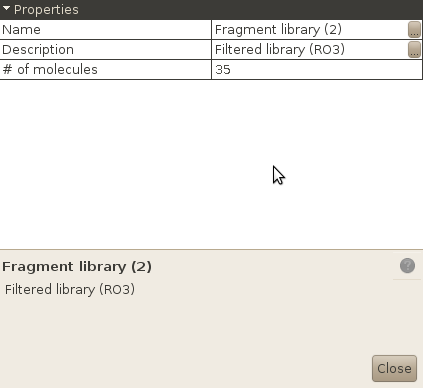
(3) Creating framework-based library
Let's finally create a library containing all molecules that belong to a particular framework.
- If not already opened, open the Framework window that will show you the framework of the selected molecule: Window->Molecule->Framework
- Next, in the search bar (toolbar on the top), type the following number: '1026', and press
enter.

- In the list of results, you should see one molecule. Click on this molecule in the search
results window. The framework of this molecule should appear in the framework view,
showing that 11 molecules are associated with this particular framework.
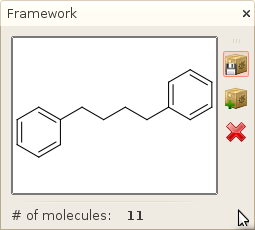
- Click on the Save as new library button (the first one)
- Enter whatever name you want, and save your library.
Go back in any of the table previously opened, and select the checkbox named "Lib". Select your newly created library and you should now see only the molecules contained by your library and having the same scaffold.
Conclusion - top
You've learned how to perform basic operations within SA2. There are plenty of other things that you can do with the software. The documentation is not completely exhaustive yet, but be patient, it will get improved with time. Here is a subset of interesting pages you may want to read:
- Learn how to plot your molecules in 2D
- Learn how to search for molecules in SA2 (similarity, substructure...)
- Learn how to derive simple statistics such as comparing property distributions between libraries...
- Frequently asked questions