Screening Assistant 2
Properties
Last edited: 18/11/2011
By: VLG
Sourceforge: SA2 website
Help: SA2 forums
Documentation index
This page provides all the information needed to understand how properties are stored in the database, and how to store your own properties in the database.
Table of Contents
- Introduction
- Existing properties
- Existing fingerprints
- Adding new properties
- Adding new fingerprints
Introduction - top
One of the most important feature of SA2 is that it has been designed to associate to each molecule, any number of properties. Focusing on molecular descriptors, there is potentially thousands of values that can be associated with each molecule. Dealing with such a large dataset is far from being trivial, especially in a database supposed to store millions of molecules. Various solutions have been tested to deal with such amount of data, and we finally ended up with the most basic one, which actually provides the best compromise between performance, stability and flexibility.
In SA2, Properties are organized by Tables. A property can be anything: biological activity, molecular descriptors... They are stored in different Tables, where you will want to group related properties together. In other words, each Table can be seen as a simple spreadsheet table (e.g. in Excel), where rows correspond to molecules, and columns correspond to properties.
Fingerprints on the other hand, are stored in dedicated Tables. They are stored in binary format. This is probably not the best choice in term of storage, but hey... disk space is certainly not the most expensive thing that you will need in your drug discovery pipeline ;)
Additionally, each table is associated with a Category, and each category can contain multiple Tables and sub-categories. This way, you can bring a bit of organization in the plethora of data that can be associated with each molecule, although there is of course still many room for improvement...
Existing properties
In SA2, various property tables will be created when you will create a new SA2 database. Here is the complete list of tables available by default in the current version. Note that to populate these tables with actual values, you need to either enable / compute the corresponding worker (if available, e.g. CDK / JOELib workers), or retrieve the properties yourself and import them in SA2 using the supported input files (e.g. the MOE tables).
- 'Basic Properties'
This is the main table where HTS flags and basic properties are stored. This table is NOT editable (you can't import properties in it), and is systematically populated when importing new molecules. - 'SA1 descriptors' Table
Used to store all the descriptors (JOELib-based) that were available in the first version of Screening Assistant. The table will be empty if you don't use the JOELib worker - 'MOE 2D'
Used to store all MOE 2D descriptors. You will need to compute by yourself the descriptors and import them afterward (or directly when importing your SDF file as shown in the quickstart guide). - 'MOE 3D'
Used to store all MOE 3D descriptors. - 'CDK *'
Six tables that group all the CDK descriptors by types (CDK Topological, CDK Hybrid, CDK Geometrical, CDK Protein, CDK Electronic, CDK Constitutional). You must use the CDK worker to populate these tables.
Important note some descriptors will always be empty because of various issues - performances or errors - detected in the CDK library.
Existing fingerprints
- 'SA1'
A small fingerprint based on the JOELib library that encodes both simple properties as well as substructural features. See the JOELib worker documentation for a more detailed description. - 'MACCS'
The widely used MACCS fingerprint as defined and calculated in the CDK library. See the CDK worker documentation for a more detailed description. - 'EState'
A structural fingerprint using EState fragments as defined and calculated in the CDK library. See the CDK worker documentation for a more detailed description. - 'Pubchem'
Another structural fingerprint available in the CDK library. See the CDK worker documentation for a more detailed description.
Adding new Properties - top
You can add your own new properties, either on-the-flight when importing new molecules / importing new properties in the database, or by creating them explicitely by hand (Database->Properties, or using the List of properties window). Simple enough, not much to say :)
Just note that when imorting properties in the database using the import wizzard (either SDF or CSV), you will be able to create new tables on the flight, but you will not be able to create new property in existing tables!. To do so, use the List of properties.
Adding new fingerprints - top
Adding new fingerprints deserve a bit more explanations, although it is very similar to importing properties.
First of all, when you create yourself a new fingerprint, you actually create the storage capability for your fingerprint. There is by definition no way to compute this new fingerprint within SA2 (unless you create your own worker), As a consequence, the actual fingerprints values for each molecule must be computed using your own tool, and subsequently imported in SA2 (in a very similar way to the CSV import), as illustrated in the quickstart guide..
This has one important consequence: when you compute a similarity search on a new molecule (drawn in the sketcher), you will actually not be able to use your own fingerprints as the basis of your similarity search. For such molecule, you will only be able to use the fingerprints that can be computed within SA2, e.g. all fingerprints that can be calculated through the available workers. That makes sense, right? :)
Note also that you can't create new fingerprints when importing molecules, and you can't either import your fingerprints directly when you import a new sets of molecules. You will have to first, import you molecules, and then import fingerprints.
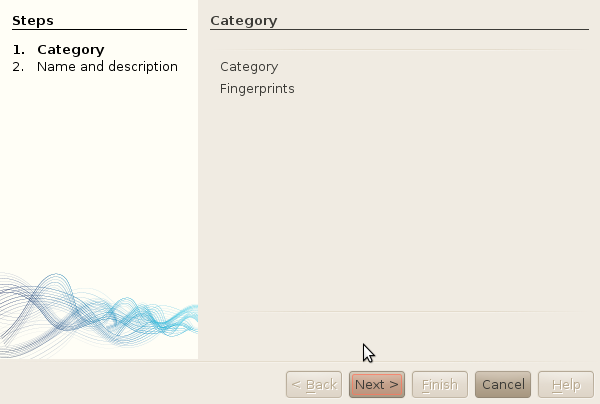
So... to create a new fingerprint:you will have to use the properties window. To create a new fingerprin: left-click on any the of categories available, and select Add new fingerprint.
-
Open the Properties window.
-
Left-click on any the of categories available. A good idea would be to either create
a new category storing your own fingerprints, or to use the
Fingerprint category. This is what we will do here.

-
Click Next.
-
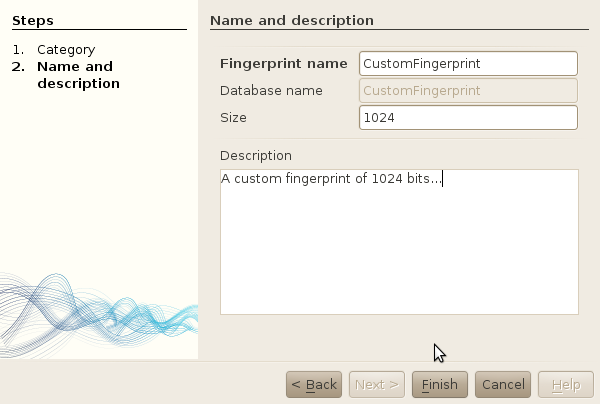
Give a name, a size and an optional description to your new fingerprint.

-
Click finish.
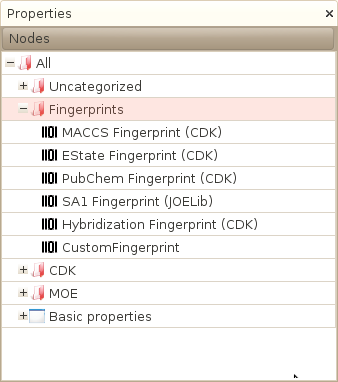
The new fingerprint table should now appear in the Properties window, in our case, in the Fingerprint category as shown in the following screenshot:
